Archive
Basic Mysql command line activity
Step1: Open the Terminal.
To open the Terminal, navigate to Applications > Accessories > Terminal
Step2: Login into Mysql
syntax: mysql -u username -ppassword
–u = Mysql username
-p = Mysql password
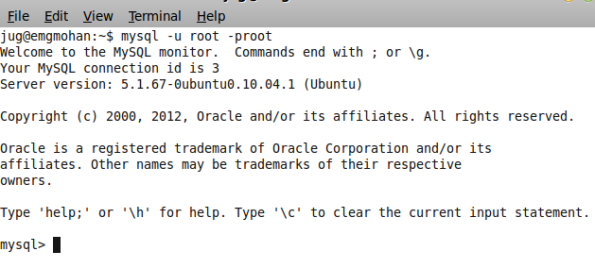
Type the below command in Terminal to enter in mysql
cmd: mysql -u -root -proot
Step3: List the Databases.
cmd: show databases;
Step4: Create Database.
syntax: create database databasename;
cmd: create database emg;
Note: Replace the name ’emg’ by the name you want to create database.
Step5: Create new user accessible only in Localhost
syntax: create user ‘username‘@’localhost’ IDENTIFIED BY ‘password‘
cmd: create user ‘tpemg’@’localhost’ IDENTIFIED BY ‘tp.emg’
Note: Replace the name ‘tpemg’ by the name you want to create user.
Note: Replace the name ‘tp.emg’ by the name you want to create password.
Step6: Create new user accessible from anywhere.
syntax: create user ‘username‘@’%’ IDENTIFIED BY ‘password‘
cmd: create user ‘fpemg’@’%’ IDENTIFIED BY ‘fp.emg’
Note: Replace the name ‘fpemg’ by the name you want to create user.
Note: Replace the name ‘fp.emg’ by the name you want to create password.
Step7: Assign user to database with permissions.
syntax: GRANT ALL ON databasename.* TO ‘username‘@’localhost’;
cmd: GRANT ALL ON emg.* TO ‘tpemg’@’localhost’
Note: Replace the name ’emg’ by the name of the database you want to assign user.
Note: Replace the name ‘tpemg’ by the name of the user you want to assign to database.
Step8: In order to take effect of permission to the database in above command, ‘Flush Privileges’ command should be executed. This command should be executed after every permission change in database.
cmd: flush privileges;
Step9: Drop a Database.
syntax: drop database databasename;
cmd: drop database testemg;
Step10: Export (Backup) a Database.
syntax: mysqldump -u root -proot –databases databasename > /Path to save/name.sql
cmd: mysqldump -u root -proot –databases emg > /home/jug/Desktop/emg.sql
Note: Replace the name ’emg’ by the name of the database you want to take backup.
Step11: Import (Restore) a Database.
syntax: mysql -u root -proot databasename < /home/jug/Desktop/name.sql
cmd: mysql -u root -proot emg < /home/jug/Desktop/emg.sql
Note: Replace the name ’emg’ by the name of the database you want to restore.
Thats it……..
How do optical mice work?

It appears that the wheeled mouse is in danger of extinction. The now-preferred device for pointing and clicking is the optical mouse.
Developed by Agilent Technologies and introduced to the world in late 1999, the optical mouse actually uses a tiny camera to take 1,500 pictures every second. Able to work on almost any surface, the mouse has a small, red light-emitting diode (LED) that bounces light off that surface onto a complimentary metal-oxide semiconductor (CMOS) sensor.
The CMOS sensor sends each image to a digital signal processor (DSP) for analysis. The DSP, operating at 18 MIPS (million instructions per second), is able to detect patterns in the images and see how those patterns have moved since the previous image. Based on the change in patterns over a sequence of images, the DSP determines how far the mouse has moved and sends the corresponding coordinates to the computer. The computer moves the cursor on the screen based on the coordinates received from the mouse. This happens hundreds of times each second, making the cursor appear to move very smoothly.
Optical mice have several benefits over wheeled mice:
* No moving parts means less wear and a lower chance of failure.
* There’s no way for dirt to get inside the mouse and interfere with the tracking sensors.
* Increased tracking resolution means smoother response.
* They don’t require a special surface, such as a mouse pad.
Although LED-based optical mice are fairly recent, another type of optical mouse has been around for over a decade. The original optical-mouse technology bounced a focused beam of light off a highly-reflective mouse pad onto a sensor. The mouse pad had a grid of dark lines. Each time the mouse was moved, the beam of light was interrupted by the grid. Whenever the light was interrupted, the sensor sent a signal to the computer and the cursor moved a corresponding amount. This kind of optical mouse was difficult to use, requiring that you hold it at precisely the right angle to ensure that the light beam and sensor aligned. Also, damage to or loss of the mouse pad rendered the mouse useless until a replacement pad was purchased. Today’s LED-based optical mice are far more user-friendly and reliable.
To know more Technically, Download: PPT
How To Set Up A Network Domain:

Welcome to the wonderful world of domains and active directory.
Active Directory is centralized network management at it’s best. There are lots of reasons to set up a network domain and they include security, ease of administration and the ability to automate a lot of features that are cumbersome to roll out manually. Think about being able to manage all your user and computer accounts from one console. You can set “rules” for specific groups of users and say who can and cannot do what on YOUR network!
We will walk you through how to set up a Windows 2003 Active Directory Domain. To start you will need a Windows 2003 Server and the installation media that came with it. We will need to install the Windows DNS Server, configure the machine to have a static IP address and let it point to itself as your server’s DNS server. Grab everything you need and let’s get started.
When you start up your Windows 2003 Server you will see this screen:
To begin we will need to click the green arrow pointing to the right that says add or remove a role. This will start the wizard. Make sure you have all your network cables connected and your server online.
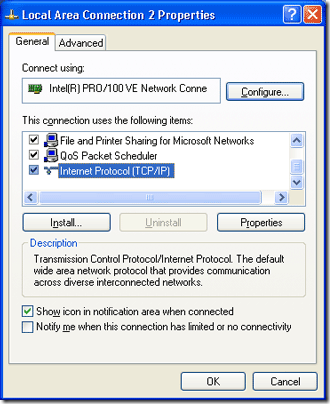
I would set your IP address to be static at this point if you have not already. To do so obtain a static IP address from your network administrator or choose one yourself if you are on your own network. To do this right click on network neighborhood and choose properties.
Next highlight Internet Protocol TCP/IP and hit the properties button to configure your IP address.
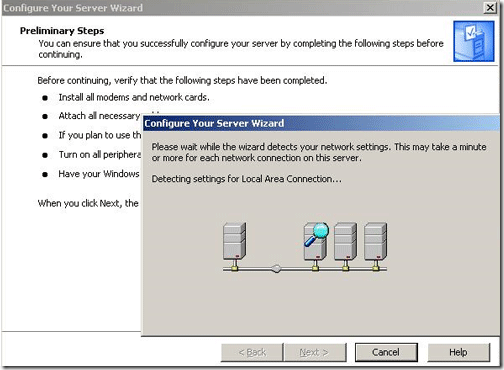
You will want to have the use the following IP address button checked as well as the use the following DNS server addresses button. Fill in the appropriate information and let’s move on. Click OK. That will take us back to our add a server role wizard. It will detect your settings as seen below:
Once it completes you will see the following screen:
If this is your first time setting up a domain run with the first option. This will install DNS and DHCP for you automatically. DNS stands for Domain Name Service and allows for your computers to talk to each other as well as connect to the Internet. DHCP stands for Dynamic Host Configuration Protocol and this allows computers to automatically have their IP addresses configured for them from your server. These services are very important for your network.
After you hit next we will see the screen that allows us to name our domain:
Choose your name carefully as it is almost impossible to change it later. You can use the extension .local instead of .com or .net to separate your domain from an Internet address. In this case we have AskTheAdmin.com which is a internet address and and active directory domain. If you are just testing you can use whatever you want to. The next screen asks you for your netbios names. You can leave these as the default. This is how older machines will see your computer and domain name.
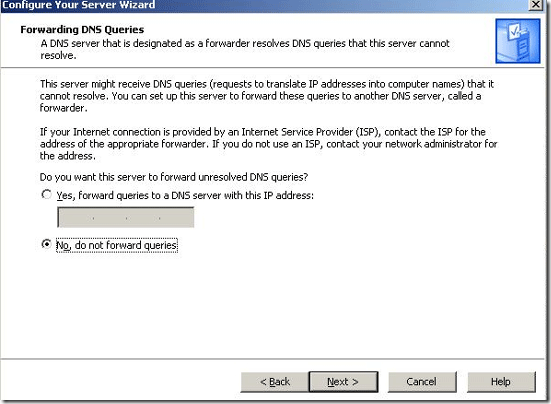
Now we will get into how you want to handle name resolution. When you set up your clients to use your new internal DNS server you have an option of what to do with requests for Internet names like http://www.firstplanet.in. If you choose to forward queries to another server you can use your ISP’s DNS server to allow websites to be resolved. If you choose no your DNS server will not return web addresses and you might be unable to browse the Internet.
Click next and continue on. You will be asked to insert your Windows 2003 Server media and then you will see this screen telling you that you are complete.
You can now restart your server and begin setting up your users using the new shortcut on your start menu called Active Directory Users and computers like so:
That will take you to this console:
You can set up group policy or “rules” for each of your OU’s (organizational units) and that is a fancy name for the folders on the left. You can right click on any folder and choose properties –> group policy –> open to configure it.
Share your thoughts by comments!
Simple Steps To Diagnose A Network Problem:

There are a couple of basic commands to diagnose a network problem.
You have an issue with a computer on your network. It cannot connect to the internet and doesn’t have any network resources. The first thing you need to do is check the condition of the physical connection i.e. the network cable. After that is secured, I jump to a command prompt and do a IPCONFIG /all like so:
I check that the IP address, default gateway and subnet mask are all correct. If they are not, I make my modifications and we are back online. Too bad the problems don’t usually go away that easily. Next up, I attempt to ping the servers by IP address using the ping command, like so:
Now I check for DNS issues by pinging the server’s name. If this fails, it is our internal DNS issue and I know where to move on to.
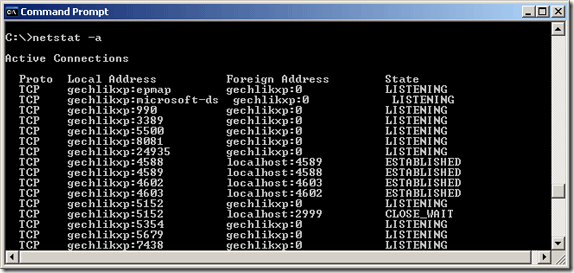
If I get a correct response, I try to ping a website like http://www.google.com. That tests external DNS resolution. If that works as well, the trouble runs deeper. I would then run a Netstat –a and see who is connected to my machine and determine if maybe a Trojan or virus has gained control of it.
Everything looks clean. Now I would try pathping or tracert between the machine and the internet to diagnose any remaining network problems.
During your tests you might conclude that another machine is using the same IP address or host name as your desktop and causing issues. For this, using Angry Ipscanner.exe (found here ) to query for that IP address or the entire network to find the host name…

If you cannot figure out what is going on and why you cannot get to the resource you are trying to, then the issue might be network-related and has nothing to do with your machine. First, check if you can get to the resource from a different machine.
100 portable must apps.
If i missed any commands means, share by comments!
