Archive
Apache Tomcat SSL Port Foward
Table Of Content:
1) Apache Web Server Installation:
2) SSL Certification installation
3) Port Forward Setup in Apache(Mod JK Conf)
4) Apache – SSL Virtual Host Conf
5) Tomcat URL Redirection
Apache Web Server Installation:
root ~$ apt-get install apache2
This command will install apache webserver in local system with default configuration. After installation completed, service will be automatically started in port 80.
root ~$ /etc/init.d/apache2 status
To view the apache webserver status.
Installing and configuring mod_jk
root ~$ apt-get install libapache2-mod-jk
This command will install lib of mod-jk in apache webserver.
SSL Certification installation:
We have installed and configured letsencrypt ssl certificate in local system.
Installed by Network Team.
Letsencrypt configuration file location
~# /etc/letsencrypt
By default ‘options-ssl-apache.conf’ file will be created in /etc/letsencrypt. If not, we can create manually under the location ‘ /etc/letsencrypt ‘.
options-ssl-apache.conf
—————————-
————————————————————————————————————————
# This file contains important security parameters. If you modify this file
# manually, Certbot will be unable to automatically provide future security
# updates. Instead, Certbot will print and log an error message with a path to
# the up-to-date file that you will need to refer to when manually updating
# this file.

SSLEngine on

# Intermediate configuration, tweak to your needs
SSLProtocol             all -SSLv2 -SSLv3
SSLCipherSuite          ECDHE-ECDSA-CHACHA20-POLY1305:ECDHE-RSA-CHACHA20-POLY1305:ECDHE-ECDSA-AES128-GCM-SHA256:ECDHE-RSA-AES128-GCM-SHA256:ECDHE-ECDSA-AES256-GCM-SHA384:ECDHE-RSA-AES256-GCM-SHA384:DHE-RSA-AES128-GCM-SHA256:DHE-RSA-AES256-GCM-SHA384:ECDHE-ECDSA-AES128-SHA256:ECDHE-RSA-AES128-SHA256:ECDHE-ECDSA-AES128-SHA:ECDHE-RSA-AES256-SHA384:ECDHE-RSA-AES128-SHA:ECDHE-ECDSA-AES256-SHA384:ECDHE-ECDSA-AES256-SHA:ECDHE-RSA-AES256-SHA:DHE-RSA-AES128-SHA256:DHE-RSA-AES128-SHA:DHE-RSA-AES256-SHA256:DHE-RSA-AES256-SHA:ECDHE-ECDSA-DES-CBC3-SHA:ECDHE-RSA-DES-CBC3-SHA:EDH-RSA-DES-CBC3-SHA:AES128-GCM-SHA256:AES256-GCM-SHA384:AES128-SHA256:AES256-SHA256:AES128-SHA:AES256-SHA:DES-CBC3-SHA:!DSS
SSLHonorCipherOrder     on
SSLCompression          off

SSLOptions +StrictRequire

# Add vhost name to log entries:
LogFormat "%h %l %u %t \"%r\" %>s %b \"%{Referer}i\" \"%{User-agent}i\"" vhost_combined
LogFormat "%v %h %l %u %t \"%r\" %>s %b" vhost_common

#CustomLog /var/log/apache2/access.log vhost_combined
#LogLevel warn
#ErrorLog /var/log/apache2/error.log

# Always ensure Cookies have "Secure" set (JAH 2012/1)
#Header edit Set-Cookie (?i)^(.*)(;\s*secure)??((\s*;)?(.*)) "$1; Secure$3$4"
Port Forward Setup in Apache :
I assume already compiere with tomcat setup completed.
Now apache running on port 80 and tomcat running on port 7085( refer below server.xml file). We are going to forward the incoming request on port 80 to tomcat running on port 7085.
My tomcat Server.xml file as follows
———–
<!– A “Connector” represents an endpoint by which requests are received
and responses are returned. Documentation at :
Java HTTP Connector: /docs/config/http.html (blocking & non-blocking)
Java AJP Connector: /docs/config/ajp.html
APR (HTTP/AJP) Connector: /docs/apr.html
Define a non-SSL HTTP/1.1 Connector on port 8080
–>
<Connector port=”7085″
protocol=”HTTP/1.1″
connectionTimeout=”20000″
maxHttpHeaderSize=”7192″
maxThreads=”150″
minSpareThreads=”25″
maxSpareThreads=”75″
enableLookups=”false”
redirectPort=”6434″
acceptCount=”100″
disableUploadTimeout=”true” />
<!– A “Connector” using the shared thread pool–>
<!–
<Connector executor=”tomcatThreadPool”
port=”8080″ protocol=”HTTP/1.1″
connectionTimeout=”20000″
redirectPort=”8443″ />
–>
<!– Define a SSL HTTP/1.1 Connector on port 8443
This connector uses the JSSE configuration, when using APR, the
connector should be using the OpenSSL style configuration
described in the APR documentation –>
<Connector port=”6434″
maxHttpHeaderSize=”7192″
maxThreads=”150″
minSpareThreads=”25″
maxSpareThreads=”75″
enableLookups=”false”
disableUploadTimeout=”true”
acceptCount=”100″
scheme=”https”
secure=”true”
clientAuth=”false”
SSLEnabled=”true”
keystoreFile=”/home/oracle/cpcapp2/Compiere2/keystore/myKeystore”
keystorePass=”myPassword”
sslProtocol=”TLS” />
<!– Define an AJP 1.3 Connector on port 8009 –>
<Connector port=”7009″ enableLookups=”false” protocol=”AJP/1.3″ redirectPort=”6434″ />
—–
Now we will create our workers.properties file for Apache
root ~# nano /etc/apache2/workers.properties
Paste the below text in workers.properties
# Define 1 real worker using ajp13
worker.list=worker1
# Set properties for worker (ajp13)
worker.worker1.type=ajp13
worker.worker1.host=localhost
worker.worker1.port=7009
In my tomcat, i have used port 7009 for AJP connector. So i used that port in workers.properties file.
Configure Apache to use worker file, for that edit jk.conf file in Apache2
Disable the jk.conf file by using below command
root ~# a2dismod jk
root ~# nano /etc/apache2/mods-available/jk.conf
change the JkWorkersFile property to
/etc/apache2/workers.properties
Before:
<IfModule jk_module>
# We need a workers file exactly once
# and in the global server
JkWorkersFile /var/log/apache2/workers.properties
After:
<IfModule jk_module>
# We need a workers file exactly once
# and in the global server
JkWorkersFile /etc/apache2/workers.properties
Enable the jk.conf file by using below command
root ~# a2enmod jk
Apache – SSL Virtual Host Conf:
sites-available:
If default SSL(default-ssl.conf) enabled, disable it.
Create new file for SSL configuration. I have created new file cpc_ssl.conf under ‘sites-available’ (/etc/apache2/sites-available).
In this file i have mentioned the workers.properties and ssl installed location.
Content as follows
<IfModule mod_ssl.c>
<VirtualHost *:443>
ServerName http://www.my.local.in
ServerAdmin mohanpalanichamy@sample.com
DocumentRoot /var/www/html
ErrorLog ${APACHE_LOG_DIR}/error.log
CustomLog ${APACHE_LOG_DIR}/access.log combined
#Redirect permanent / https://0.0.0.0/
<Directory “/var/www/html”>
# AuthType Basic
# AuthName “Restricted Content”
# AuthUserFile /etc/apache2/.htpasswd
# Require valid-user
# CheckSpelling On
# CheckCaseOnly On
</Directory>
# Mount your applications
JkMount /* worker1
Include /etc/letsencrypt/options-ssl-apache.conf
SSLCertificateFile /etc/letsencrypt/live/my.local.in/cert.pem
SSLCertificateKeyFile /etc/letsencrypt/live/my.local.in/privkey.pem
#SSLCertificateChainFile /etc/letsencrypt/live/my.local.in/chain.pem
</VirtualHost>
Enable the cpc_ssl.conf file by using below command
root ~# a2ensites cpc_ssl
Restart the apache server.
root ~# /etc/init.d/apache2 restart
Verify the URL in browser
URL – https://my.local.in/apps/Compiere.html
It should load the home page.
Tomcat URL Redirection:
Instead of entering full path(https://my.local.in/apps/Compiere.html) in browser, will configure tomcat to redirect request from domain url to home page.
For that, Go to the file path ..\apache-tomcat-7.0.x\webapps\ROOT\index.jsp
Add the below lines of code at the top of the index.jsp
<% response.sendRedirect(“https://my.local.in/apps/Compiere.html “);%>
<% response.sendRedirect(“http://yourRedirectionURL “);%>
Please note that in jsp file you need to start the above line with <% and end with %>
Now in browser if you enter https://my.local.in it will be automatically redirected to https:///my.local.in/apps/Compiere.html.
Sync Mail configuration in my project
Environment Setup:
OS: Ubuntu 14.04
Send Mail Client: Download from the below URL
http://caspian.dotconf.net/menu/Software/SendEmail/
1.Extract and copy the send mail client to /usr folder
In Terminal:# cp -a sendEmail-v1.XX/sendEmail /usr/local/bin
2. Make the file as executable
chmod +x /usr/local/bin/sendEmail
3. Test by executing the below command in terminal
In Terminal:# sendEmail or /usr/local/bin/sendEmail
4. Create a view in production database
CREATE OR REPLACE VIEW synchtest AS
SELECT count(1) AS syncstatus
FROM sym_outgoing_batch
WHERE sym_outgoing_batch.status <> ALL (ARRAY[‘OK’::bpchar, ‘NE’::bpchar]);
5. Create bash script file to automate sync mail.
the conditions as follows
If sync count is equal to zero, No need to send email.
If sync count is not equal to zero, then email will be send to customer and support desk.
SyncCheck.sh
————————————————————————————————————————————-
rm -rf /home/preprod/syncmail/syncconf.txt
PGPASSWORD=123456
export PGPASSWORD
/opt/PostgreSQL/9.0/bin/psql -h serverip -U adempiere -d databasename -o /home/preprod/syncmail/syncconf.txt -c ‘select * from synchtest’;
PGPASSWORD=
export PGPASSWORD
#Sync Condition check
syncount=`sed -n ‘3p’ /home/preprod/syncmail/syncconf.txt`;
echo $syncount;
if [ $syncount -ne 0 ]; then
/home/preprod/syncmail/SyncMailNE.sh
else
exit 1
fi
——————————————————————————————————————————————-
SyncMailNE.sh – Copy & paste the below script and make it as executable.
——————————————————————————————————————————————-
/usr/local/bin/sendEmail -f fromaddress@mail.com \
-t toaddress@mail.com \
-s smtp.gmail.com:587 \
-o tls=yes \
-xu fromaddress@gmail.com \
-xp fromaddress password \
-u “subject” \
-m “body text message” \
-a /attachment/location/syncconf.txt
——————————————————————————————————————————————-
6. Create a cronjob
In Terminal:# sudo crontab -e
30 10 * * * /home/pothys/syncmail/SyncCheck.sh >> /var/log/synchmaillog 2>&1
For Gmail, install the following plugin in ubuntu
In Terminal:# sudo apt-get install libnet-ssleay-perl libio-socket-ssl-perl
Also Enable less secure access for gmail account use the below given link for instruction
https://support.google.com/accounts/answer/6010255
Note: For other domain email id’s you can use directly
Share your thoughts!
Windows Postgresql Auto Backup_Restore from Production To Pre-Production
Copy the below script’s in notepad and save as Batch file.
Backup_Restore.bat script as follows;
———————————————————————————————————————————————————————————————————————
@echo off
set BackupName=pothys_restore
set ProductionDB=pothysdev
set ProductionServerIP=192.168.0.231
set PreProductionDB=pothystest
set ProductionDBAdminPwd=postgres
set PreProductionDBAdminPwd=postgres
set AdempierePwd=123456
cd\
cd C:\Program Files\PostgreSQL\8.4\bin\
SET PGPASSWORD=%ProductionDBAdminPwd%
echo ========================
echo Production Server Backup
echo ========================
@ping 127.0.0.1 -n 2 -w 1000 > nul
@ping 127.0.0.1 -n %1% -w 1000> nul
pg_dump.exe –host %ProductionServerIP% –port 5432 –username postgres –format plain –no-owner –verbose –file “C:\%BackupName%.sql” %ProductionDB%
echo ===========================
echo Deleting The DB In Pre-Prod
echo ===========================
SET /P ANSWER=Do you want to continue (Y/N)?
echo You chose: %ANSWER%
if /i {%ANSWER%}=={y} (goto :yes)
if /i {%ANSWER%}=={yes} (goto :yes)
goto :no
:no
echo You pressed no!
exit /b 1
:yes
echo You pressed yes!
rem exit /b 0
echo =========================
echo Terminating Connections..
echo =========================
@ping 127.0.0.1 -n 2 -w 1000 > nul
@ping 127.0.0.1 -n %1% -w 1000> nul
SET PGPASSWORD=%PreProductionDBAdminPwd%
psql -U postgres -c “SELECT pg_terminate_backend(pg_stat_activity.procpid) FROM pg_stat_activity WHERE pg_stat_activity.datname = ‘%PreProductionDB%’ AND procpid <> pg_backend_pid();”
psql -U postgres -c “DROP DATABASE %PreProductionDB%;”
echo ===================
echo DB Deletion Done !!
echo ===================
@ping 127.0.0.1 -n 2 -w 1000 > nul
@ping 127.0.0.1 -n %1% -w 1000> nul
echo ===========================
echo Creating New DB In Pre-Prod
echo ===========================
@ping 127.0.0.1 -n 2 -w 1000 > nul
@ping 127.0.0.1 -n %1% -w 1000> nul
psql -U postgres -c “CREATE DATABASE %PreProductionDB% WITH ENCODING=’UTF8′ OWNER=adempiere CONNECTION LIMIT=-1;”
psql -U postgres -c “\q”
echo ==================
echo DB restore started
echo ==================
@ping 127.0.0.1 -n 2 -w 1000 > nul
@ping 127.0.0.1 -n %1% -w 1000> nul
SET PGPASSWORD=%AdempierePwd%
psql -f c:\%BackupName%.sql -d %PreProductionDB% -U adempiere -h localhost
@ping 127.0.0.1 -n 2 -w 1000 > nul
@ping 127.0.0.1 -n %1% -w 1000> nul
echo ========================
echo DB Successfully Restored
echo ========================
——————————————————————————————————————————————————————————————————————–
DB_Restore.bat script as follows;
——————————————————————————————————————————————————————————————————————–
@echo off
Backup_Restore.bat 2>&1 | wtee -a DB_Restore_log.log
For /f “tokens=2-4 delims=/ ” %%a in (‘date /t’) do (set mydate=%%c-%%a-%%b)
For /f “tokens=1-3 delims=/:/ ” %%a in (‘time /t’) do (set mytime=%%a-%%b-%%c)
move C:\DB_Restore_log.log C:\DB_Restore_log-%mydate%_%mytime%.log
———————————————————————————————————————————————————————————————————————-
Use the below link to download the ‘wtee.exe’
http://code.google.com/p/wintee/downloads/detail?name=wtee.exe&can=2&q=
Step 1:
Copy the two batch files(Backup_Restore.bat & DB_Restore.bat) and one executable file(wtee.exe) in c: drive.
Step 2:
Open the Backup_Restore.bat file and edit the following variables according to your environment.
- set BackupName=pothys_restore
Here replace the ‘pothys_restore’ with the name that the backup file should be saved.
(Backup file name eg: pothys_restore.sql)
- set ProductionDB=pothysdev
Here replace the ‘pothysdev’ with the name of production database to be backup.
(DB name to be backup from production server eg: pothys)
- set ProductionServerIP=192.168.0.231
Here replace the ‘192.168.0.231’ with the ip of production server.
(IP Address of production server to take backup eg:192.168.3.1)
- set PreProductionDB=pothystest
Here replace the ‘pothystest’ with the name of pre-production database to be restore
(DB name to be restore in pre-production eg: pothys)
- set ProductionDBAdminPwd=postgres
Here replace the ‘postgres’ with the production server database admin password.
(Production DataBase admin password eg: postgres)
- set PreProductionDBAdminPwd=postgres
Here replace the ‘postgres’ with the pre-production server database admin password
(PreProduction DataBase admin password eg: postgres)
- set AdempierePwd=123456
Here replace the ‘123456’ with the database user adempiere password.
(Database user adempiere password eg: 123456)
After changes made, save and close the Backup_Restore.bat file.
Step 3:
Double click the DB_Restore.bat to start the process.
Step 4:
Before restoring, we need to drop the database in pre-production server with the name entered in the script if already exist.
Script will ask your confirmation to drop database in pre-production server, press ‘y’ to confirm the drop DB. If you press ‘n’, process will be stopped without proceeding next.
Step 5:
Log file was created for all activities of script with the name DB_Restore_log in c: drive.
Strictly advised to verify the log.
Finally add the ‘DB_Restore.bat’ to windows Scheduled Task to perform automatically.
Share your thoughts!
Ubuntu Subversion Server Setup
This tutorial describes setting up a Subversion server on an Ubuntu system and configuring it for use by a group of developers. The goal is to allow each member of a development team to access the Subversion repositories from a remote location (e.g., a workgroup at office), using the svn protocol.
Prerequisites
It is assumed that you already have a basic Ubuntu server running, and that the other developers can connect to it.
Basic Subversion Setup
Begin by installing the Subversion package:
$ sudo apt-get install subversion
Create a folder needed for your repositories. Most people use /home/svn or /usr/local/svn for this purpose, and you can choose either. I personally prefer /usr/local/svn over /home/svn, as I like to keep /home for home directories of real users of the system.
$ sudo mkdir /usr/local/svn
Inside this directory, create another one to hold your repositories:
$ sudo mkdir /usr/local/svn/repos
Now, you need to set some access permissions on those directories. You only want to allow certain users of your system (that is, yourself and the other developers) to access the repositories, so add a new group for those users. Name the group svn.
$ sudo groupadd svn
Then, change the group ownership of /usr/local/svn/repos to the new group using the chgrp command:
$ sudo chgrp svn /usr/local/svn/repos
The members of the svn group also need write access to the repos directory, so use chmod to add the write permission for the group:
$ sudo chmod g+w /usr/local/svn/repos
Additionally, you need to make sure that all new files and directories created in the repos directory (in other words, anything committed to the repositories) will also be owned by the group. To accomplish this, use chmod again to set the set-group-ID bit on the directory, which causes any file created inside it to have the same group ownership as the directory itself. Effectively, everything in repos will belong to the svn group.
$ sudo chmod g+s /usr/local/svn/repos
OK, so you now have the repositories directory with proper permissions, ready to be used by the svn group. Go ahead and add yourself to the group:
$ sudo usermod -a -G svn dev007
However, your new group membership will not be effective for the current session, so you need to log out and log back in. When you’re back, you can verify that your account is recognized as a member of the svn group:
$ groups
dev007 adm dialout cdrom plugdev lpadmin admin sambashare svn
If the other developers have user accounts on your server, add them to the group too:
$ sudo usermod -a -G svn dev008
$ sudo usermod -a -G svn dev009
If they don’t, they will still be able to access the repositories, but only using the basic svn protocol, not the secure svn+ssh method.
Creating a Test Repository
You can now create a repository. In the following steps, I’ll demonstrate how to create a simple test repository containing one text file, and how to check out and commit files. If you’re not familiar with Subversion, then this could be a good exercise to learn the basics. Otherwise, you can skip all the test checkouts and commits and just create the repository for your project.
The repository will be a subdirectory in the repos directory, and will have its group ownership set to svn (thanks to the chmod g+s you did earlier). However, that’s not all – you also need to make sure the repository will be group writable, so that the other members of the svn group will be able to commit files. To do this, set the umask to 002:
$ umask 002
This command sets the new file mode creation mask which controls the default permissions of any new file that you create. The default value is 022 and it corresponds to read/write permissions for the file owner, and read permissions for the group and others. The new value, 002, also gives write permissions to the group, which is just what you need.
Create the repository using the svnadmin command:
$ svnadmin create /usr/local/svn/repos/test
And set back the default umask:
$ umask 022
So you now have an empty repository, waiting for you to commit something to it. But, before you do this, you need to check out the current version (i.e., the empty directory) to create a working copy.
$ svn checkout file:///usr/local/svn/repos/test
Checked out revision 0.
The working copy has been checked out to a new directory named test. Go ahead and create a simple “hello world” text file in that directory:
$ cd test
$ echo ‘Hello, World!’ > hello.txt
Then, add it to version control with the svn add command:
$ svn add hello.txt
A hello.txt
Finally, commit it using svn commit:
$ svn commit -m “Added a ‘hello world’ text file.”
Adding hello.txt Transmitting file data . Committed revision 1.
The hello.txt file is now in the repository.
Accessing the Repository with the Svn Protocol
Remote repository access with the svn protocol requires you to use svnserve, a Subversion server program. Each repository has a svnserve configuration file (stored in the conf subdirectory) which controls how the repository can be accessed with svnserve.
$ gedit /usr/local/svn/repos/test/conf/svnserve.conf
There’s probably some default configuration in the file
Uncomment the following lines
anon-access = none
auth-access = write
password-db = passwd
authz-db = authz
The anon-access = none line denies access to the repository to unauthenticated users (by default, they are allowed read access, so they can do checkouts). The password-db setting tells svnserve where to look for the passwords file when authenticating users,
$ gedit /usr/local/svn/repos/test/conf/authz
Create the group and repository path
Under the [group] enter group name (eg: test_pm) and after “=” enter user name in order to access the repo (eg: arul)
sample entry of my authz file
[groups]
# harry_and_sally = harry,sally
# harry_sally_and_joe = harry,sally,&joe
test_pm = arul
test_dev = gaj,senthil,padma,avinash,bibin,thiru,dhina,lavanya,suganya
test_rmg = reena,subramanian
[test:/]
# harry = rw
# &joe = rw
#* = rw
@test_pm = rw
[test:/Branch]
#@harry_and_sally = rw
#* = r
@test_pm = rw
@test_dev = rw
@test_rmg = rw
[test:/Trunk]
#@harry_and_sally = rw
#* = r
@test_pm = rw
[test:/Trunk/Test]
#@harry_and_sally = rw
#* = r
@test_rmg = rw
@test_dev = rw
[test:/Trunk/UAT]
#@harry_and_sally = rw
#* = r
@test_rmg = rw
@test_dev = rw
[test:/Trunk/Prod]
#@harry_and_sally = rw
#* = r
@test_pm = rw
[test:/Tag]
#@harry_and_sally = rw
#* = r
@test_pm = rw
@test_rmg = rw
$ gedit /usr/local/svn/repos/test/conf/passwd
This is a password file where you can maintain password’s for all user’s who have access in this repo only.
Sample entry of my passwd file
[users]
# harry = harryssecret
# sally = sallyssecret
arul = lEs3D2
senthil = rvWvsn
reena = BxnXZ4
padma = LKO4Qh
OK, the configuration is ready, so you can now launch svnserve.
$ sudo svnserve -d –foreground -r /usr/local/svn/repos
The command-line options tell svnserve to run in daemon mode (-d) as a foreground process (--foreground), and to look for repositories in the repos dir that was created earlier (-r /usr/local/svn/repos). Normally the program should be running in the background (that’s what daemon processes do), but at this moment you only need to test it, so it’s more convenient to run it in the foreground, where you can easily kill it with Ctrl+C.
Now, try accessing the repository using the svn protocol. You can try it on another machine over the network, or on the same computer (in another terminal). In the latter case, make sure you’re not doing the checkout in the same directory where the previous test working copy was checked out, because it won’t work – either delete the test directory, or cd to some other location.
Enter the following svn checkout command, replacing 192.168.10.11 with the IP address of your Subversion server (if you’re testing on the same machine, you can use 127.0.0.1):
$ svn checkout svn://192.168.10.11/test/Branch –username arul
The server will ask you for password:
Authentication realm: <svn://192.168.10.11:3690> 08f022d5-400c-4fb4-95d8-b90880c7cc77
Password for ‘arul’:
Then, it proceeds with the checkout.
A test/hello.txt Checked out revision 1.
And there’s your working copy. Now, check if it works the other way – try modifying the file and committing it back to the repository. Open hello.txt with a text editor and add some text:
$ cd test
$ gedit hello.txt
When you’re done, commit it:
$ svn commit -m “Modified the hello.txt file.”
Sending hello.txt Transmitting file data . Committed revision 2.
Sweet, it works both ways.
Svnserve Initialization Script
If you plan on using svnserve in the long run, you probably don’t want to start it from the command-line every time the server is rebooted. The proper way to start system services is with init scripts located in the /etc/init.d directory.
The Subversion package for Ubuntu does not include an init script, so you have to make one yourself. Or, you can download this init script. Save the script as /etc/init.d/svnserve and make it executable:
$ sudo chmod +x /etc/init.d/svnserve
If you chose anything other than /usr/local/svn/repos for the repositories directory, make sure to change the path in the init script.
Run update-rc.d to install the script:
$ sudo update-rc.d svnserve defaults
Adding system startup for /etc/init.d/svnserve … /etc/rc0.d/K20svnserve -> ../init.d/svnserve /etc/rc1.d/K20svnserve -> ../init.d/svnserve /etc/rc6.d/K20svnserve -> ../init.d/svnserve /etc/rc2.d/S20svnserve -> ../init.d/svnserve /etc/rc3.d/S20svnserve -> ../init.d/svnserve /etc/rc4.d/S20svnserve -> ../init.d/svnserve /etc/rc5.d/S20svnserve -> ../init.d/svnserve
And that’s it – svnserve will be started automatically when your system boots up. To start it manually, run this command:
$ sudo /etc/init.d/svnserve start
Share your Thoughts!
Ubunut Scheduled System Shutdown with Notification
Step1: Install ‘gnome-schedule’ which is a graphical user interface to manage your crontab file
cmd: apt-get install gnome-schedule
Step2: Install ‘libnotify-bin’ which sends desktop notifications to a notification daemon.
cmd: apt-get install libnotify-bin
Step3: Configure notification in user account.
*Login into the user account in which the notification to be enabled.
*Navigate to Application->System Tools->Schedules tasks to open ‘scheduled tasks’.
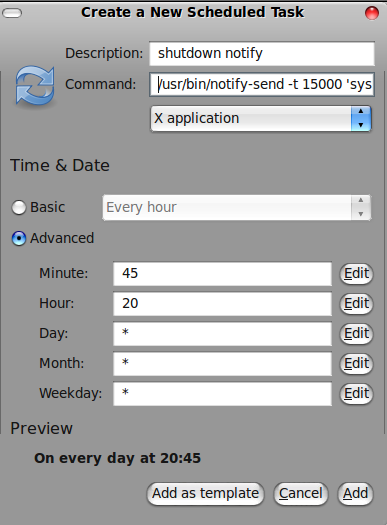
*Click ‘Add new task’ to add new entry in cronjob.
*Select the type as ‘A task that launches recurrently’.
*In Description, enter the title of the job.
*In Command, Copy and paste the following script.
/usr/bin/notify-send -t 15000 ‘system will automatically shutdown in 15 min,so properly close everthing before system shutdown!!!’
* Select ‘X Application’ from the below drop down.
*Set the time to run this job before 15 mins of system shutdown job(next we will configure).
Step4: Configure shutdown command in root account.
*Navigate to Application->Accessories->Terminal to open Terminal.
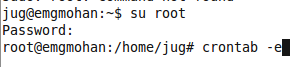
*Login into root account by using ‘su root’ command.
*Enter the password of root.
*Enter the following command to edit crontab file(open with nano editor).
cmd: crontab -e
*Set the crontab entry as follows.
00 21 * * * /sbin/shutdown -h now
 *Save and exit.
Note: ‘ctl+o’ to save, then press ‘ENTER’ to conform the file, then ‘ctl+x’ to exit.

Go home without tension……
global warming

 Webdesign Bookmarks: Use It
- An error has occurred; the feed is probably down. Try again later.

