Archive
Basic Mysql command line activity
Step1: Open the Terminal.
To open the Terminal, navigate to Applications > Accessories > Terminal
Step2: Login into Mysql
syntax: mysql -u username -ppassword
–u = Mysql username
-p = Mysql password
Type the below command in Terminal to enter in mysql
cmd: mysql -u -root -proot

Step3: List the Databases.
cmd: show databases;
Step4: Create Database.
syntax: create database databasename;
cmd: create database emg;
Note: Replace the name ’emg’ by the name you want to create database.

Step5: Create new user accessible only in Localhost
syntax: create user ‘username‘@’localhost’ IDENTIFIED BY ‘password‘
cmd: create user ‘tpemg’@’localhost’ IDENTIFIED BY ‘tp.emg’
Note: Replace the name ‘tpemg’ by the name you want to create user.
Note: Replace the name ‘tp.emg’ by the name you want to create password.

Step6: Create new user accessible from anywhere.
syntax: create user ‘username‘@’%’ IDENTIFIED BY ‘password‘
cmd: create user ‘fpemg’@’%’ IDENTIFIED BY ‘fp.emg’
Note: Replace the name ‘fpemg’ by the name you want to create user.
Note: Replace the name ‘fp.emg’ by the name you want to create password.

Step7: Assign user to database with permissions.
syntax: GRANT ALL ON databasename.* TO ‘username‘@’localhost’;
cmd: GRANT ALL ON emg.* TO ‘tpemg’@’localhost’
Note: Replace the name ’emg’ by the name of the database you want to assign user.
Note: Replace the name ‘tpemg’ by the name of the user you want to assign to database.

Step8: In order to take effect of permission to the database in above command, ‘Flush Privileges’ command should be executed. This command should be executed after every permission change in database.
cmd: flush privileges;

Step9: Drop a Database.
syntax: drop database databasename;
cmd: drop database testemg;

Step10: Export (Backup) a Database.
syntax: mysqldump -u root -proot –databases databasename > /Path to save/name.sql
cmd: mysqldump -u root -proot –databases emg > /home/jug/Desktop/emg.sql
Note: Replace the name ’emg’ by the name of the database you want to take backup.
![]()
Step11: Import (Restore) a Database.
syntax: mysql -u root -proot databasename < /home/jug/Desktop/name.sql
cmd: mysql -u root -proot emg < /home/jug/Desktop/emg.sql
Note: Replace the name ’emg’ by the name of the database you want to restore.

Thats it……..
Mysql backup script with date & time stamp
Mysql Script:
#!/bin/bash
mysqldump -u root -p(yourpasswd) –routines –databases databasename > destination/folderpath/in which dump file to be stored/name.sql
thetime=`date +%Y-%m-%d–%H:%M:%S`
mv /dump file location/bugs.sql /destination of dump file with date and time stamp/name-$thetime.sql
Sample Script:
#!/bin/bash
mysqldump -u root -proot –routines –databases bugs > /home/jug/Desktop/mysql/bugs.sql
thetime=`date +%Y-%m-%d–%H:%M:%S`
mv /home/jug/Desktop/mysql/bugs.sql /home/jug/Desktop/mysql/bugs-$thetime.sql
Thats it..
LAMP Stack Setup On Ubuntu 10.04
LAMP?
Short for Linux, Apache, MySQL and PHP, an open-source Web development platform, also called a Web stack, that uses Linux as the operating system, Apache as the Web server, MySQL as the RDBMS and PHP as the object-oriented scripting language. Perl or Python is often substituted for PHP.
In this tutorial I use the hostname TP059 with the IP address 10.0.1.5. These settings might differ for you, so you have to replace them where appropriate.
Step1: Login as a user
Step2: Navigate to Applications > Accessories > Terminal to fire up the terminal window.
Step3: switch the user login to root by entering the following command.
- Cmd: “su”
- Type the root password

Now I have the full access in this system (admin)
I’m running all the steps in this tutorial with root privileges
Step4: Installing Apache2
There are two Methods to install the apache webserver in Ubuntu desktop
- Online Method (From Ubuntu Repository)
- Offline Method (Download the Installable(.deb & tar.gz) file from website)
Online Method Installation (From Ubuntu Repository)
Let’s start the apache web server installation (apache version 2.2)
Apache2 is available from Ubuntu repository, therefore we can install from terminal using the following (simple) command
cmd: apt-get install apache2

Offline Method Installation (Installaing .deb file)
Download the apache2 from the url belowhttp://packages.ubuntu.com/lucid/apache2-mpm-event
Open the terminal and navigate to the folder where apache installable (.deb) file saved (by default it will be in “Downloads” folder).
cmd: cd /root/Downloads
Type the following command in Terminal to install the manually downloaded package.
cmd: dpkg –i apache2-mpm-event_2.2.14-5ubuntu8.11_i386.deb
Once the installation is completed, direct your browser to http://10.0.1.5, and you should see the Apache2 placeholder page (It works!):

Step5: Installing Mysql
Lets see the MySQL Databaser server installation on ubuntu desktop
There are two Methods to install the apache webserver in Ubuntu desktop
- Online Method (From Ubuntu Repository)
- Offline Method (Download the Installable(.deb & tar.gz) file from website)
Online Method Installation (From Ubuntu Repository)
Mysql is available from Ubuntu repository, therefore we can install via Terminal:
Enter the following command in terminal:
cmd: apt-get install mysql-server mysql-client

Offline Method Installation (Installaing .deb file)
Download the Mysql server from the url http://packages.ubuntu.com/lucid-updates/i386/mysql-server-5.1/download
Open the terminal and navigate to the folder where apache saved (by default it will be in “Downloads” folder).
cmd: cd /root/Downloads
Type the following command in Terminal to install the manually downloaded package.
cmd: dpkg –i mysql-server-5.1_5.1.69-0ubuntu0.10.04.1_i386.deb
Download the Mysql client from the url http://pkgs.org/ubuntu-10.04/ubuntu-main-i386/mysql-client-5.1_5.1.41-3ubuntu12_i386.deb.html
Open the terminal and navigate to the folder where apache saved (by default it will be in “Downloads” folder).
cmd: cd /root/Downloads
Type the following command in Terminal to install the manually downloaded package.
cmd: dpkg –i mysql-client-5.1_5.1.41-3ubuntu12_i386.deb
You will be asked to provide a password for the MySQL root user – this password is valid for the user root@localhost as well as root@10.0.1.5
New password for the MySQL “root” user: “your root password for Mysql DB Access”
Repeat password for the MySQL “root” user: “Enter same password as entered before”


Step6: Installing PHP5:
Lets see the PHP installation on ubuntu desktop
There are two Methods to install the apache webserver in Ubuntu desktop
- Online Method (From Ubuntu Repository)
- Offline Method (Download the Installable(.deb & tar.gz) file from website)
Online Method Installation (From Ubuntu Repository)
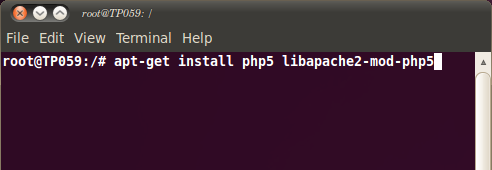
Enter the following command in Terminal to install PHP5 and Apache PHP5 module :
cmd: apt-get install php5 libapache2-mod-php5
Offline Method Installation (Installaing .deb file)
Download the PHP5 from the url http://pkgs.org/ubuntu-10.04/ubuntu-universe-i386/php5-mcrypt_5.3.2-0ubuntu1_i386.deb.html
Open the terminal and navigate to the folder where apache saved (by default it will be in “Downloads” folder).
cmd: cd /root/Downloads
Type the following command in Terminal to install the manually downloaded package.
cmd: dpkg –i php5-mcrypt_5.3.2-0ubuntu1_i386.deb
Now restart Apache webserver:
To restart apache, enter the following command in terminal
cmd: /etc/init.d/apache2 restart

Step7: Testing PHP5 / Getting Details About Your PHP5 Installation:
The document root of the default web site is /var/www. We will now create a small PHP file (info.php) in that directory and call it in a browser. The file will display lots of useful details about our PHP installation, such as the installed PHP version.
Create the info.php file using gedit: Enter the following command in terminal:
cmd: gedit /var/www/info.php

Copy the following code into the file and save it:
<?php
phpinfo();
?>

Now we call that file in a browser (e.g. http://10.0.1.5/info.php):
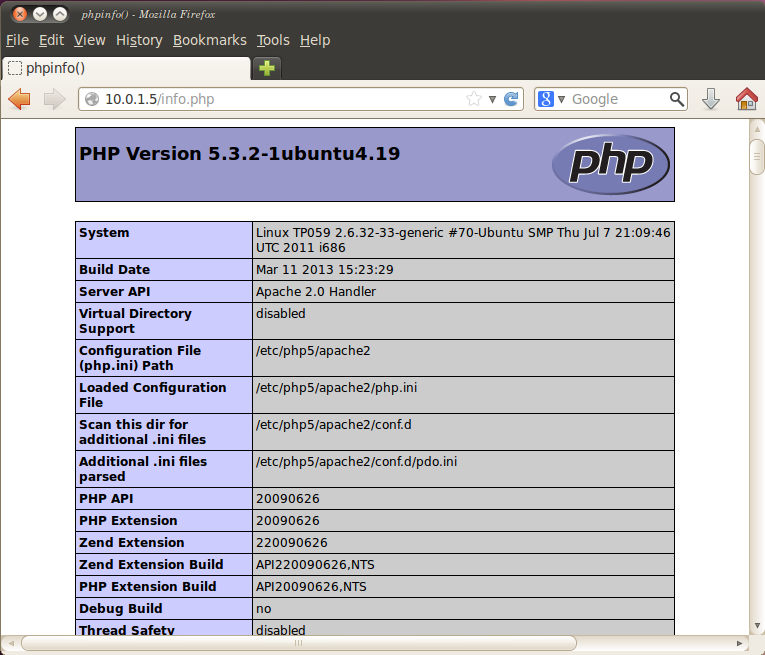
As you see, PHP5 is working, and it’s working through the Apache 2.0 Handler, as shown in the Server API line. If you scroll further down, you will see all modules that are already enabled in PHP5. MySQL is not listed there which means we don’t have MySQL support in PHP5 yet.
Step8: Getting MySQL Support In PHP5:
To get MySQL support in PHP, we can install the php5-mysql package. It’s a good idea to install some other PHP5 modules as well as you might need them for your applications. You can search for available PHP5 modules by entering the following command in Terminal:
cmd: apt-cache search php5

Select the modules according to your need and install them like this:
Enter the following command in Terminal:
cmd: apt-get install php5-mysql php5-curl php5-gd php5-intl php-pear php5-imagick php5-imap php5-mcrypt php5-memcache php5-ming php5-ps php5-pspell php5-recode php5-snmp php5-sqlite php5-tidy php5-xmlrpc php5-xsl

Now restart Apache2 to enable modules by entering the following command in Terminal:
cmd: /etc/init.d/apache2 restart
Now reload http://10.0.1.5/info.php in your browser and scroll down to the modules section again. You should now find lots of new modules there, including the MySQL module:

Step9: Installing phpMYAdmin:
Let’s install the phpmyadmin to handle the administration of MySQL with the use of a web browser.
There are two Methods to install the apache webserver in Ubuntu desktop
- Online Method (From Ubuntu Repository)
- Offline Method (Download the Installable(.deb & tar.gz) file from website)
Online Method Installation (From Ubuntu Repository)
To install phpMyAdmin enter the following command in Terminal:
cmd: apt-get install phpmyadmin

Offline Method Installation (Installaing .deb file)
Download the phpMYAdmin from the following url http://packages.ubuntu.com/lucid/all/phpmyadmin/download
Open the terminal and navigate to the folder where apache saved (by default it will be in “Downloads” folder).
cmd: cd /root/Downloads
Type the following command in Terminal to install the manually downloaded package.
cmd: dpkg –i phpmyadmin_3.3.2-1ubuntu1_all.deb
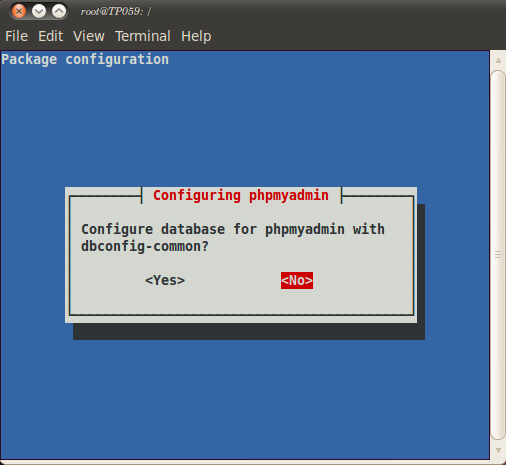
During the installation you will see the following questions:
Web server to reconfigure automatically: <– apache2
Use Space Bar key to select “apache2” and Tab key to select “ok”

Configure database for phpmyadmin with dbconfig-common? <– No
Afterwards, you can access phpMyAdmin under http://10.0.1.5/phpmyadmin/


Ubuntu:Creating an unattended install
Creating an unattended install consists of the following steps:
- Create a configuration file, ks.cfg, using the GUI Kickstart tool.
- Extract the files from the Ubuntu install ISO.
- Add the ks.cfg file to the install disk and alter the boot menu to add automatic install as an install option.
- Reconstitute the ISO file.
Kickstart tool is in the Ubuntu repositories, so search for it using the package manager or install it via the command line, as follows:
# apt-get install system-config-kickstart
Once installed, the Kickstart GUI tool should place itself in the System Tools menu of the application launcher. Launching it, you will be presented with a configuration page. Modify according to your requirment.
Now save the Kickstart configuration file. By default it is called ks.cfg, but you can give it any name. It’s a good idea to check over the configuration file manually by launching it in a text editor. We now need to copy the files from the Ubuntu install CD-ROM into a directory on the hard disk. Download the alternative install ISO (rather than the live CD) from the Ubuntu website and place it in your home directory. Mount this disk from the command line:
In Terminal:
#mkdir iso_mount# mount -o loop ubuntu-10.04.4-alternate-i386.iso /media/iso_mount
This makes the files inside the ISO accessible via the directory iso_mount. Note that you can browse this directory using a file manager, but we’d recommend doing the actual file copying from the command line because hidden files and directories must be preserved. Copy the files to a directory inside your home directory and make them writable with:
In Terminal:
# mkdir ubuntu_files# rsync -a /media/iso_mount/ ubuntu_files/# chmod -R 777 ubuntu_files
Place the Kickstart file that you have created into the ubuntu_files directory. Now we have to tell the install system where to find the Kickstart configuration file when it boots. Load text.cfg, located in the isolinux directory, into a text editor. This file contains the menu options that you first see when you boot an Ubuntu installation disk. Locate the menu options for a standard install and then cut and paste them so that you have a second copy. We’re going to alter it so that it looks like this: Add the following script at the top, below “default live” line.
label autoinstallmenu label ^Automatically Install Ubuntukernel /install/vmlinuzappend file=/cdrom/preseed/ubuntu.seed initrd=/install/initrd.gzks=cdrom:/ks.cfg --
We’ve altered the label and title of this new menu entry, added a reference to the location of the Kickstart file and removed the ‘quiet’ flag so that we get lots of progress information. This constitutes the entirety of the changes we have to make, and we can now re-create the ISO file.
In Terminal:
#cd ubuntu_files# mkisofs -D -r -V “$IMAGE NAME” -cache-inodes -J -l -b isolinux/isolinux.bin -c isolinux/boot.cat -no-emul-boot -boot-load-size 4 -boot-info-table -input-charset iso8859-1 -o ~/autoinstall.iso .Note:“.” Dot at the end of the above command is must which intimate the end of command.Now write this bootable iso file to CD and start unattended ubuntu installation. Thank You
How to configure Disk Quotas On Ubuntu
A Disk Quotais a limit set by a system administrator that restricts certain aspects of Filesystem Usage. Disk Quotas are very useful in large multi-user environment.
Quotatool is a utility to set filesystem quotas from the commandline.
To install, Open the terminal and type:
#apt-get install quota quotatool

Edit the /etc/fstab & add usrquota and grpquota options to the mount point, so the kernel knows to manage that partition using quotas.
To open “fstab” file, Open the terminal and type:
#gedit /etc/fstab

Already there will be a mount point for example “/”, just modify the following line according your mount point.
# /dev/sda1 UUID=4ea80ca3-37b7-447e-831a-700a38627029 / ext4 defaults,errors=remount-ro,usrquota,grpquota 0 1
After adding, fstab looks like this:

We then need to create 2 files that manage the quota levels in the root of the partition:
To create, Open the terminal and type:
#touch /quota.user /quota.group

#chmod 600 /quota.*

To make the setting take affect we then need to remount the partition
#mount -o remount /
OR
Reboot the system
To check that it worked, investigate /etc/mtab:
To open “mtab” file, Open the terminal and type:
#gedit /etc/mtab

It should look similar to:
/dev/sda1 / ext4 rw,usrquota,usrquota 0 0

When each quota-enabled file system is remounted, the system is now capable of working with disk quotas. However, the file system itself is not yet ready to support quotas. To do this, you must first run quotacheck.
#quotacheck -avugm


Now you need to run quotaon command, quotaon announces to the system that disk quotas should be enabled on one or more filesystems.
#quotaon –avug

Configure how the system is going to manage them:
I’m going to be managing quotas on a per user basis, each user is going to be allowed to store up to 5Gb of data! To configure a user we use the edquota command which will open up an editor.
To assign quota for particular user, Open the terminal and type:
#edquota -u satori -f /

Default quota config file:

After assigning 5GB quota:

We can confirm the change by entering the user quota command in terminal:
# quota -u satori

If quota assigned, output like so:

ThankYou
global warming

 Webdesign Bookmarks: Use It
- An error has occurred; the feed is probably down. Try again later.

